
Starting with Colour and very simple first stage mixing
Practicing with mixing colours and keeping a colour record
How is your colour vision: Introduction:
The Ishihara Test for colour vision – check it out online.
Simple Exercises in colour mixing and recording, using water based paint for best drying times. The best way to do this is to dedicate a painting pad just to colour mixing that you can use to record your mixes. Choose from Acrylic or ordinary Water Colour, student quality is sufficient. Tubes of water colour are easier to apply on a colour chart, but if you only have a set of colours in pans, (the small square, dry water colour blocks) then use those. But beware them getting tainted with colours next to each other, you may need to take the pans out and clean the top layer if they have been well used.
Preparation and materials. You will need a small square flat brush, a pencil and ruler for drawing your grid and three colours in your chosen water-based paint. Ideally start with primary colours such as red, blue and yellow.
- You will need an A5 (half the size of A4 is all you need but you may want to go bigger as you add more columns of mixes) or A4 water colour painting pad as these pads will also be fine for watered down acrylic or gouache if you already have any of these three paints, but we cover gouache in a separate lesson later this month so you may want to wait for that session before buying any.
- Draw onto a few of the pages in your pad, a grid of squares roughly one inch by one inch and fill the page with as many columns of squares as will fit, using the one inch by one inch measurement minimum (2.5 x 2.5cms; use a ruler to get the columns straight. I would suggest you create several pages of these grids as you will be using more and more of them as you build up a table of shades and lights in each colour column. If you have some spare time gradually fill one pad with grids on each page.
- Keep the top square of each column blank so you can write in the name of each colour, as there are example many different shades and hues of colour that you will need to be able to remember as to which one is which and how the white and black lightening and darkening looks for each of the types of blue, yellow or red. This may seem tedious in the early stages, but you will soon be skipping right to a ready mixed green for example, or a ready mixed combination from a colour wheel that you can add either white or black to, to see how that changes the tone, density or transparency. You will be amazed how may shades and hues there are in this process.
- If you want to, you can keep the left hand column of squares blank too, to note how much white or black you added, eg, a brushful or a pipette dropper of so many drips if you want to be really precise, but mostly I used single or double ‘brushfuls’ to see whatthat did and then I added more brushfuls to each level down to the bottom of the columns, so you could just note in the left hand column, 1, 2, or 3 brushfuls as appropriate. This is only a rough guide so you add the white or black gradually.
- Key Suggestion: Go to any DIY supplier of paint and gather some sample strips of colour to see how this grid you are going to create works, and you will find thousands of the best brand companies produce these sample cards to show you how finely they mix colours to suit every home or other interiors/exteriors. However you will not know necessarily which base colour they started from so don’t torture yourself trying to work that out right now. They also batch number their shades on the tins as even these big producers of paint cannot always absolutely match and repeat a previous batch of paint. When decorating your house its often the case that years later when you want to refresh the paint job, the paint batch number would have changed so it doesn’t match perfectly anyway, so you end up painting whole walls instead of part areas. You need to know, therefore, how to create and then save anything that you want to create again in your painting choices of palette. Its not essential to be too pedantic about it but it helps save hours of testing so its good to know how to record all that for future reference. In the case of oils or acrylic paint, if you can mix enough of it to keep for another painting or illustration and not have to ‘find’ that colour again then its good to save any paint in an air tight container, old jars or pots, as it can be too time consuming to ‘find’ the mix again and it never quite matches if you don’t have a system for identifying what you have mixed with what.
- Adding white to your base colours. Taking each colour, (I would start with a Red, a Yellow and a Blue), paint each one at the top of column, which will be the second one down when you have written the colour name in the top squares, paint the full colour in the second square and gradually add white to each square until you get to full white at the bottom.
- Do the same with adding black. On a separate page, repeat the exercise, adding black to the original colour, down to full black at the bottom. Add enough in each square to see the changes progress all the way down, so as to ensure you have made a difference each time. If you overdo this or under-do it, do not worry, it will give you useful practice in the mixing and you will auto-correct as you get used to it. Don’t overthink it or overwork it, just take what comes and if you want to try another column to repeat the practice you will find yourself knowing just how much or how little to add to each square.
- Once you have completed this exercise with the main colours, often called Primaries, mix two of the primaries together to produce a secondary colour – eg, yellow and blue in equal measure and create a green. Then you can make two columns of that colour adding white to one and black to the other until you reach full white and full black at the bottom. You could also mix Red and Blue in equal amounts to create a purplish shade and do the same with two columns, one to down to white and one down to black.
As you work with the colour grids, it will obviously be best to either remove the pages you have painted and, once dry, you can tuck them back into the painting pad, or save them in a folder. If you find the column work a bit tedious, you can mix a few shades of green with unequal amounts of green and blue, let that dry and then add white or black to see how many different shades it produces, but do it randomly off grid and it will give you a break from grid building! Choose some colours straight from you tubes or pans that are already a mixed colour, and play with adding white and black to the main colour – but feel free to save those results in one square of a separate sheet and label what you mixed and what proportions – for example, Red mixed with a few brushfuls of blue, paint it in a square, let it dry and then note in the square to the left of it how much blue you added to get that colour, how many brushfuls is enough to note down for now.
You can also use just a range of different blues, there are many of them, and use the white and black additions on a whole range of blues, or do it with a whole range of reds using the same method. Or just have a random mixing hour now and then to see what colours you can find.
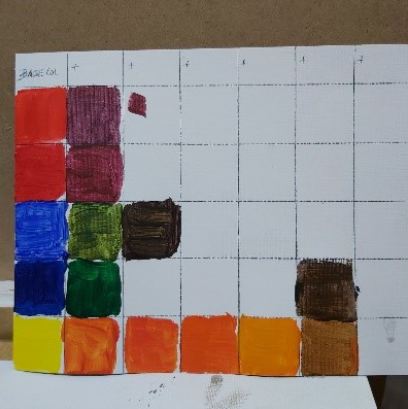
A very rough, half hour mix of primaries, no black or white added, just randomly place primaries in the left column and adding blue to the reds and yellow to the blue to get the greens. In this case there was a cobalt blue and ultramarine blue each mixed with the same lemon yellow to get three shades of green.